 |
| Welcome to the Happiest Place on Earth! |
Ah yes, he we go, yet another awesome Breyerfest to look
forward to with live horses, models, contests, carnie food, models, room sales,
and did I mention MODELS? I’m excited and the Kentucky Horse Park is in my
backyard, so to speak, and I’ve worked there for four seasons (as well as been
to about a dozen Breyerfests). For many, it’s a shining jewel in their events
for the year, traveling to the Mecca of all things horse. Breyerfest brings
home “Our Tribe,” a group of friends we usually only see this once a year. And
we almost always make new friends as we get first timers to make the journey
and see what all the fuss is about.
In an attempt to reduce stress all around, I do have some very important tips
I’d like to share to make it the most enjoyable and EASY trip as possible, not
only for the newbies, but for crowds in general! For simplicity’s sake, I’m
going to write this as if I’m explaining it to someone who’s never been to
Breyerfest, the Kentucky Horse Park, Kentucky in its humid summer, or around
horses in general. I'm going to give some basic guidelines about etiquette
around horses, which some may think sounds pretty simple and obvious,
especially to those who have or deal with horses on a regular basis, but I
understand some may never have realized these rules, either through
inexperience or unintended ignorance. We all start somewhere!
 |
| OVERSTIMULATION! |
Stuff in bold is
REALLY important and a good tip to pay special attention to.
A couple quick tips to get us started (that we may go over
in depth later):
- ·
Plan your
schedule ahead of time. Breyer usually posts the program online via PDF
file (Seen HERE!) with a schedule and map so you can plan your day to make sure you see the performances, seminars
and more that you want to see. Prices for Special Runs in the Mercado, Breyer Store, and SPecial Ticket items will also be visible on there so you can budget your weekend.
- ·
Use a
lightweight backpack or tote to bring stuff like water, snacks, and supplies
like a sunscreen, hand sanitizer, camera, spare batteries, collapsible umbrella, poncho, etc. Always be
prepared!
- ·
Carpool
if you possibly can! Parking is a headache, especially on Friday at the
Park and at the Clarion on just about any night. Reduce the number of parking
spaces needed (bonus: help the environment!) and carpool if you at all can.
- ·
Dress
comfortably and don’t forget your physical needs to stay cool, fed, and
hydrated!
- ·
Do NOT
touch ANY MODEL without permission. This includes sales models. It’s only
proper etiquette.
- ·
Stay in
touch with friends especially if you’re carpooling or plan to meet up. Cell
service can be iffy both at the Park and the Clarion, so create a “Meet Here
When” plan if technology fails.
- ·
Use the
Breyerfest App if available! It’s actually very handy, especially for first
timers, to allow you to take notes, find places at the Park, keep you reminded
of schedules, and more! So far, an actual app is only found on Apple iOS. Unfortunately there's not an Android App (so far the Android version was only made one year) due to limited resources (Breyer can only do so much), but it can also be found here on Lightsphere which does work much like the iOS app with an Android or Windows Phone using your phone's web browser.
The Lines and NPOD
 |
| Good Luck ever seeing it this devoid of humans... |
The line that develops at the entrance to Breyerfest on the
Friday (and Saturday to an extent) morning is extremely crowded and filled with
excited anticipation and various forms of plotting. With Breyerfest so close we
can taste it, and a Black Friday-esque sale going on in the Breyer Store
(a.k.a. the Ninja Pit Of Death, or NPOD), as soon as the massive crowd is
"released," it can border on the feeling of chaos depending on where
you are in line.
 |
| Beep! |
First, the drive to get into the Park! I would like to
offer this helpful tip and really want to encourage this: If you are not trying to get to the Breyer
Store for the NPOD, have a 9:30 Ticket for the Special Items, or desperately want to see the Opening
Ceremonies, I would suggest NOT showing up until later in
the morning, after 10:00 AM. The line truly is enormous and takes a
while to get through, and Breyerfest is going to be there all day/weekend. Just
because it opens at 9, doesn't mean you HAVE to be there... unless you need to be for the above reasons.
The gates officially open at 9:00 AM (though I know people who line up MUCH
earlier than that), with Opening Ceremonies at 9:30 AM which last about half an
hour to 45 minutes, after which most exhibitions begin. If you absolutely MUST
be there when the gates open, try to get there early, like 6:30 or 7:00 AM, bring a camp chair, and be prepared to just chill.
Friday is very busy because there’re lots of employees that work at the Park
itself, plus office employees from various associations (USEF, USDF, Pony Club,
etc.), so it may be nice to be considerate if
you notice a solid or striped Orange KHP hangtag over someone’s rear-view mirror
and let them ahead of you, they may be trying to get to work. Also remember
that Parking will be $5 per day unless you have a $15 weekend pass (purchase recommended!) or $50 season pass to the
Park.
 |
| It can kinda be like that... |
As for standing in the line to actually get through the
gates, this has been a point of controversy and ill feelings for many years but
it seems to go without saying and everyone needs to remember, there are
CHILDREN and ELDERLY in this line. Do
NOT push and shove, act inappropriately, instigate any conflicts, or
otherwise make the situation worse than it is. Injuries have happened in the
past and they really didn't have to happen. Please remain calm and TRY to act
polite, even when in the NPOD (hey, I can at least ask...) They have made this
better in the past with handing out numbers so there’s a “First come, first
served” system: as you show up to stand in line around the parking lot, you’re
given a number if you want to go to the NPOD. They will only accept people in
the order of the numbers to enter the NPOD. They also have this system for the
Breyer Pop Up Store (this year called the Breyer Bazaar). This helps, but
remember to hold on to your number. If
it’s your first year at Breyerfest, I would suggest NOT going to the NPOD. It
is NOT for the faint of heart. They tend to have some “leftover” special
runs from various events and web specials, occasionally some real gems like sample models or unpainted blanks, etc. BUT it can get quite tense in there with some real strong
personalities. It didn’t get its nickname for nothing!
 |
| Hi, Fluffy! |
This is one of the few times the Kentucky Horse Park uses their Mounted Police,
in action and ready for duty for pedestrian control. The only other time
they make such a strong presence is during Rolex, the international 3-Day
Event. When the Officers do allow the
line to move on towards the Covered Arena, you must STAY BEHIND THEM. You
are not allowed to pass them and if you do, they will run down any offenders
and send them to the very back of the line which tends to be at the other end
of the parking lot. It’s best to listen to what they say and follow their
directions. They are real police officers (a division of the State Troopers I believe) with plenty of experience
and can uphold the law and order in any way they see fit.
 |
| They really are quite friendly :) |
For the Special Item
Tickets line, remember to show up a good 15-20 minutes before the actual
ticketed time so you can find your place in line and be in the right spot
when the front number is called. Technically, if you aren’t there when the line
gets moving, you have to be at the back of the line no matter what your number
was. They usually have this area covered with roof tents and misting fans, but
there’re no chairs and people tend to sit on the grass. You may be standing a
while (like up to 45 minutes if you end up towards the end of the line), feel free to chat with your neighbors and make some new friends!
 |
| Back of the line is less than ideal, but fair's fair... |
Remember, you can’t
take shopping bags into the Breyer Store and this includes the Special Ticket
Line. You will either need to use Breyer’s Bag Check, or I heavily suggest returning to your car and putting your goods in a
shady spot in the vehicle OR find a friend to hold and watch your bags for you.
There has been problems with people stealing from the Bag Check in the past,
though they have added a system to make that less likely, I still suggest
securing your bags on your own if possible, and sealing/tying/zippering any bag you do check so nothing falls out. This usually doesn’t include purses
and some smaller backpacks/totes so you can usually take them in, but they may ask to inspect them at some point. Be nice to the Lions Club volunteers for standing in the sun and doing their job of screening and crowd control!
For Three Day Ticket Holders, unless you’re only there the
one day, if you don’t need to pick up
your Celebration Model on Friday, then don’t. The line is usually crazy
long the first day but at various times on Saturday and Sunday you can pretty
much just walk up to the window and grab it. On Day 2 and 3, sometimes there’s a short line of
about 50 feet tops, but it’s a lot easier on everyone to just pick it up on Saturday or Sunday instead. You are guaranteed to get this model, after all!
Keeping Your Cool and
Playing It Safe
 |
| Accurate. |
The biggest challenge at Breyerfest (besides trying to do
everything you want!) if staying healthy and cool in the hot sun or dry and
safe during rain showers or thunderstorms. Mid-July is pretty much the peak of
Kentucky’s summer, with humidity usually hovering at around 80% or higher,
temperatures rarely below 85 degrees Fahrenheit (30 degrees Celsius), and
bright, skin-frying sun! Sunscreen is
highly suggested, as is personal battery-operated fans, and WATER. Be sure to dress with the heat in mind:
shorts, tank tops or t-shirts, ball caps, sunhats or visors are all great
ideas. For footwear, wear what is
comfortable for long periods of standing and walking. There are usually no
guest golf carts to hail and the Trolley is a one way trip with no stops (and
not part of the Breyerfest ticket) so it’s all walking everywhere. Flip flops
and sandals, while cooler, may not be ideal in such a dusty, dirty,
horse-occupied environment. Be mindful of your feet if you decide to get close
to a horse to pet them (more on that later). I suggest sneakers or running
shoes with vents.
Bring Water! If you have a way to
freeze water bottles, that is a great way to keep yourself cool and hydrated.
Don’t bother bringing a cooler, it’d be much too bulky and heavy to drag
through crowds. A nice, light-weight backpack or tote is likely the best bet, carrying up to 1.5 liters of water per
person per day minimum. Some people use Camelbaks, a special insulated
water bag carried on the back. Between Camelbaks and cooling bandanas (a cloth
tube filled with silicone beads that trap water, tied around the neck). They
can keep you cool if they’re freshly cooled, and if you rotate them often, but
they can also insulate body heat. I
have found them more of a hindrance than a help personally. If you do need to
run water over yourself, chose areas where blood vessels are close to the skin:
wrists, ears (MY favorite), face, neck, and legs. Bringing sports drinks like
Gatorade is also not a bad idea, especially towards the end of the day when
salt and electrolyte levels are getting low or if you experience exhaustion.
Keep an eye out for
these symptoms for heat exhaustion and seek help from Park or Breyerfest staff
if you experience them:
- ·
Confusion. (more than usual… ;)
- ·
Dark-colored urine (a sign of dehydration)
- ·
Dizziness.
- ·
Fainting.
- ·
Fatigue. (best to take rest breaks often anyway
to avoid exertion)
- ·
Headache. (one of the most common symptoms)
- ·
Muscle or abdominal cramps. (a rumbly tummy is usually a result)
- ·
Nausea, vomiting, or diarrhea. (it may not be
the carnie food…)

If you or someone you see has any of these, immediately notify staff (or even
a friend or passerby so they can keep an eye on you until you get help). Remove as much clothing as possible and lay the person on their side; if the victim throws up, this is the best position so they don't choke on their own vomit. Do not offer cold water to drink as this could be a shock to the system and it's likely a good idea not to give them water at all if they're unconscious or close to it as they can choke on it. Do seek shelter in a building with Air Conditioning (Visitor Information
Center, Museum, Restaurant, etc.) if they can move or things like shade, fans, etc. Do not
try to fan yourself, this uses too much energy. Place any cold drinks or packs in areas like armpits, groin, back of the knees, lower back, and nape of the neck to help cool these vascular areas faster so the brain doesn't overheat. There’s always someone every
year that has problems, and thankfully there’re usually EMTs nearby due to the
horse shows going on.
Not only is the heat a concern for you, but for your models as well! The plastic Breyer models are made of is heat sensitive and may bend, warp, or bloat in extreme heat. This is especially likely with the more recent models released which are made of a slightly softer plastic and some molds with thin legs like Weather Girl and the Mawari are more susceptible. It's best to keep them in the shade, and depending on how hot and sunny it gets, the car may not be safe. If you need to put your models in the car (and you weren't lucky to park underneath a tree), pick a shady spot inside such as under a seat, in the trunk, or reflective windshield sun shades. This is a good idea to deter thieves anyway: can't steal what they can't see, though break ins in the parking lot are very rare. Storing models insulated coolers (like what you'd use to keep drinks cool) is also a good idea, maybe even going as far as to line the bottom with bagged ice or ice packs. Ice will melt and create humidity of course, so make sure you buffer with lots of plastic, garbage bags, or slightly inflated pool floats (not recommended for models in boxes or the boxes will get soggy, damaged, and bleed ink onto the models). Customs and painted Resins should NEVER be left out in a hot car or they can become sticky or damaged! If you can, drive models back to your hotel to keep them safe from the heat. Your parking pass for the weekend will let you back in. Cracking windows or coming out to run the AC on occasion (as cold as you can get it) can also help. Days that are perpetually cloudy are not usually an issue. Which brings me to...
 |
| Tut tut, looks like rain... and tornadoes... |
Occasionally, Breyerfest is WET. Thunderstorms and flooding
can happen and happen often during the heat and humidity cycles in Kentucky. Storms tend to come from the west (by I-75) and south (Ironworks Pike) so keep an eye on those directions for clouds. Keeping a poncho or umbrella (great to keep
the sun off too!) handy in your backpack is a great idea. If you do use an
umbrella or poncho, be mindful around horses and don’t shake, flap, or brandish
it near one in case the horse is scared. If
you see lightning, SEEK SHELTER IMMEDIATELY. Barns are good, enclosed areas
like the Visitors Information Center or Museum are even better. Also, be
careful if there’s flooding on roadways on your drives to and from the Park.
Most of the main paths to and from hotels are usually safe, but if you take a
back road (like to visit farms), do not attempt to drive
through any standing water on the road. Even a few inches can lift and wash
away a car! It usually takes a particularly strong downpour for this to happen,
but the creek around the Park (Cane Run) can rise from nothing to overflowing
in as little as a few hours!
Meeting the (Live!) Horses
at the Park
 |
| Mennold says Hi :) |
Most of the Park's horses are well trained to deal with the
inexperienced and most have seen it all. Most will be just fine with flash
photography, petting, and other things that may upset the average
horse. However, any guest horses for Breyerfest or competition horses
there for a show that happens to be using the Park grounds at the same time
may not be.
It is advised NOT to bother any
competition horses who are there for unaffiliated horse shows, both for
their own benefit (showing is STRESSFUL) and to reduce the risk of spread of
disease. Every horse that sets foot on the park must bring with them papers to
show they are healthy, but it's entirely possible that this is not fail-proof.
Also, these horses are riders are in a high-stress environment and in a certain
mind-set that must not be interrupted.
The most important thing to remember is that horses are
living, breathing, PREY animals. They are not dogs or cats and should not be
treated or approached like one. As one article put it: "WE
(people) are like dogs or cats. We are predators. Predators like to do new
things. Horses do not like new things, as new things usually mean the death of
them." Learn the safety rules and proper conduct when in the presence of
the real thing.
 |
| A relaxed horse getting a good pet :) |
- ·
Ask whoever is handling/riding a horse if you
may approach. It may not be a good time to come visit if the horse is being
restless, scared, preparing for a presentation, or being worked on with
grooming, hoof trimming, or saddling/tacking up.
- ·
Always walk calmly, not run, up to a horse.
Running up to a horse means you may be a predator and he may try to defend
himself.
- ·
Always approach a horse from the front or
slightly from the side, never from behind. Be sure to always be in view of
his eyeballs so he's not surprised by someone popping into his vision.
This goes double for horses wearing blinkers/blinders in harness, like the
draft horses pulling the trolley.
- ·
Horses cannot see directly behind them or in a
small blind spot directly in front of their face and under their muzzle. Be
aware of this if you reach a hand up to pet them.
- ·
Watch a horse's body language. Ears, neck position,
and tail all tell how the horse feels about your being in his space.
- +Pricked ears, ears to the side, or slightly back are fine.
- +Ears pinned back against his neck are not.
- +Stiffening of the neck, raising his head out of reach, or avoiding you altogether
means you should take the hint and leave him be for a minute.
- +Eyes wide ( I would say "with eye-whites showing" but some horses,
like Appaloosas and pintos, have eye-white that shows no matter what, so
just be aware) Half-closed eyes means the horse is very relaxed or might even
be dozing. Leaving a sleeping horse lie is also a good idea, as it's only
polite.
- +A quickly swishing tail (when not swatting at flies) is also a bad sign.
- ·
Good places to pet a horse is on the nose, face,
forehead, and neck. Avoid the ears and eyes as some horses are sensitive about
them. Make sure he sees your hand before you reach up between his eyes (a blind
spot) or he may be surprised.
- ·
Never walk behind a horse. If you need to, try
to stay back at least 10 feet and TALK to them. Say whatever you want, just
make a little noise so they can listen for you. Another way of going behind a
horse is to keep your body close and keep a hand on his rump and you go behind.
The idea behind this is instead of gaining some steam for a kick, the horse can
only (roughly) "nudge" you away. This is NOT recommended for
those not used to horses and is to be avoided if at all possible.
- ·
Watch your feet. Make sure that your feet are
one full, adult-sized step away from the horse's base. Horses like to shift
weight or move restlessly, so be prepared and watch to see if a horse is
planning to take a step so your feet aren't under them. ESPECIALLY if you are
wearing sandals or flip-flops.
- ·
DO NOT HAND FEED THE HORSES. This is a Park rule
to insure that the horses don't start getting nippy whenever hands are put near
their mouth. These horses are usually well trained to be petted on the face and
nose, and it's ok to do so. But if they expect hands to have food, a hand
may become food. Save your fingers and keep your apples, carrots, and
peppermints to yourself. Also horses have much different digestive systems from
ours. They cannot burp or throw up, so if something disagrees with them, they
can colic, which is very serious and may even cause death.
- ·
Keep an eye on your children and dogs. Just
because you know what to do doesn't mean they will, even if they don't mean to
cause harm. Some dogs are threatened by horses. Some children think all animals
are big fluffy stuffed animals that wouldn't dare hurt them. So watch your
child or dog to make sure they don't go darting in a horse's path or worse.
Serious injury or death is a big possibility.
 |
| Say hi to Harold for me :) |
- ·
The Horse-Drawn Tour Trolley does not
stop. If you see it coming, get out of the way or risk getting run over.
If you are riding the trolley and one of your items falls off, again, the
trolley does not stop. It's unsafe to stop or jump off anywhere on the trolley
route, especially on a hill, as it puts strain on the horses and risks injury to
you. (Note: the Trolley Tour is not available to Breyerfest attendees unless
you pay for a Park admission ticket, due to the sheer load of people they would
have to haul if it was open to all Breyerfest ticket holders. Do not expect to
get on with your Breyerfest Button alone. If you want to ride the Trolley, you
need to go to the Visitor’s Center and purchase a regular Park Admission ticket
and sticker, usually around $14)
- ·
And this really goes without saying but
it has happened: Do NOT open and/or enter any stall or
paddock, either by the gate or hopping over the fence. Only Park employees are
allowed to do this for obvious safety reasons. They are experienced horse
people and trained professionals. I don't care if you "have horses
yourself," it is incredibly inappropriate and unsafe.
The Clarion (Formerly
Holiday Inn North, a.k.a. The CHIN)
 |
| You can ask for real maps so you can read the numbers, but this actually ain't lying... |
The hotel where all the off-site scene is at! Room Sales,
Swap Meet, Artisans’ Gallery, Meet Ups, and not to mention more models than you’ve
likely seen in your entire life. It can be overwhelming, and is VERY easy to
get lost in. If you don’t have a very good sense of direction, stick with
someone who does, especially if they’re a veteran. I would also like to suggest coming from the Park via Ironworks Pike and right onto Newtown Pike (4-way stop, can't miss it) and not taking I-75 SB. The Exit off I-75 is very close to the entrance for the Clarion and you basically have to shoot across a couple lanes of traffic in a short amount of time to get into the left turn lane for it, which is usually backed up anyway so squeezing in can be an issue.
 |
| Please... don't do this... |
Parking can be a nightmare. There is usually Breyerfest and
Hotel Staff there to help direct traffic to where spots may be found, but
mostly they’re keeping the flow going the right direction with no promise of
parking. Carpooling or having someone
drop you off is HEAVILY suggested, as it fills up quick with rarely
anywhere to park at all after a certain time. Do not park at Denny’s, they will
tow. Sometimes they park people back behind the hotel, almost on the nearby
golf course, and may give golf cart rides to the hotel, but not back. This is a
long walk back. The most packed hours are from 5:00 PM (when the Park closes)
until about 9-10:00 PM (sometimes until almost Midnight) when families with children filter out. Either try to get there
earlier, or carpool. Remember to create
a designated meet up time and place for those you’re with in case cell service
is down.
 |
| The struggle is real. |
You’ll notice signs and posters being put up in various
well-traveled intersections, pointing you in the direction of rooms as they
explain what they have. While there’s something to be said for wandering into
every room, this can be helpful if you’re looking for something specific. Writing down or taking pictures of these
signs with your cell phone can help you remember where these rooms are and
keep you focused.
 |
| Honey! This says they have Angels- I mean Wind Dancers! |
Once again, it’s very important to remember to ask before you touch any model. They
may be for sale, but some models may have special needs so they don’t break,
one could fumble and drop something, and it’s only polite so the seller can
assist you with any questions and keep an eye on her wares anyway. Stealing is
not uncommon, so it keeps you honest to show your intentions. If you want to haggle, be respectful and
don’t lowball too much. These people spent hundreds on their room for the
weekend and need to make back that money somehow. And if they are firm on their
prices, respect that as well and either take it or leave it. Most people are
very friendly and reasonable, so don’t be afraid to ask!
 |
| If you come back with cash, you either did something very wrong or very right... |
The Swap Meet (from
7:30 PM-11:00 PM Friday night) line is very long, usually wrapping around
and down the hall way! If you want a
good spot, plan to come very early (line usually starts just before 5:00
PM) and hang out in the hall for a while. Listen to the Breyerfest volunteers
and staff for instructions as they let in a few small groups at a time so it’s
not so crowded that people knock things over. Usually one can enter and leave
freely around 10:00 PM and on. While there may not be the same things available
then, there’s still a LOT to choose from, and usually you can get a good deal.
 |
| You laugh, but it really doesn't feel this far off... |
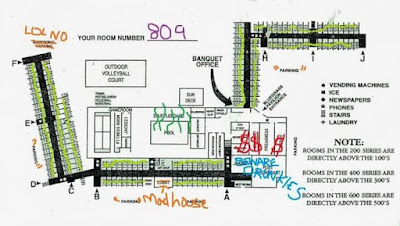
The CHIN is huge. There’re only two floors (that change levels in themselves), and technically
about four sections, but how it’s all put together is slightly… strange. We don’t
compare it to MC Escher for nothing… Also, cell
service can be nonexistent in most of the hotel no matter your provider, and indeed the property as
well. It’s truly a Bermuda Triangle type of deal. You’ll find yourself
quoting Labyrinth and expect the Goblin King to come bounding out from behind a
vending machine. Even those who have been there for years still aren’t sure how
to get to certain blocks (including the mythical 800 block). You’ll need to rely on all your senses (the smell of
the pool helps to center your internal compass and the sounds of raucous laughter
means the bar may be nearby, but no guarantee)
 |
| So the Labyrinth is a piece of cake, is it? Well, let's see how you deal with this little block... |
In Conclusion
There is so much, much more that could be
advised about, like the Model Horse Shows, Contests, Kid's Tent, local eateries and
landmarks, etc. but I either don’t have the experience to explain it or this
blog post would go on forever (and I’ve already written a book it seems). Mostly Breyerfest is about staying cool, having fun, taking pictures, and looking at
or buying lots of pretty plastic ponies! There’s no real wrong way so long as
you hit all those marks.

 The model we’ll use today is an Alborozo, considered one of
Breyer’s best molds, especially as an Andalusian. Some will like to paint him
up in fun, wild colors and patterns and she him as a Criollo, however to be
more accurate to a true Criollo, he needs some minor surgery. Andalusians and
Lusitanos have much shorter backs and longer legs more in tune with a warmblood
than the stock horse type that the Criollo is. Though they share a common ancestor,
selective breeding and possibly some outcrossing has taken them down separate paths.
The model we’ll use today is an Alborozo, considered one of
Breyer’s best molds, especially as an Andalusian. Some will like to paint him
up in fun, wild colors and patterns and she him as a Criollo, however to be
more accurate to a true Criollo, he needs some minor surgery. Andalusians and
Lusitanos have much shorter backs and longer legs more in tune with a warmblood
than the stock horse type that the Criollo is. Though they share a common ancestor,
selective breeding and possibly some outcrossing has taken them down separate paths.


